I said that we broke ground when we had to dig across the driveway for the gas line, but we REALLY broke ground today when we dug for the foundation.
Our day of excavating got off to a late start when the excavator arrived and told me that he had forgotten the key to his backhoe at his house 30 mins away. He left the trailer in the driveway and told me to start loading the bricks and broken concrete by hand. After throwing bricks from the chimney (that weren't saved by Leah for our future firepit) for about 10 mins, I realized that once the excavator arrived with his machine, he would do what would have taken me every part of an hour in about 10 mins, so I went inside and waited for him to get back. We finally got started around noon, and sure enough, in about 10 mins all of the debris was loaded into the trailer and out of the way.

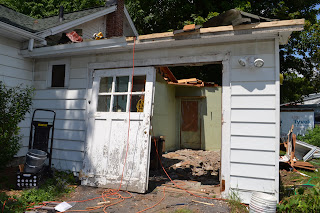
Once the bricks and concrete were loaded up, it was time to demo the rest of the chimney. We were going to try to loop a chain around it and pull it down, but the excavator wanted to go for it and just reached in to pull it down. Initially, it seemed like it would fall straight down, but of course it decided to fall to the left (towards our bathroom). It was well on its way to crashing through our shower wall, but somehow the excavator caught the stack of bricks before they ended up in our bath tub and was able to make them fall forward.


This was taken after the bricks almost fell into our house. Too bad you can't see the look on my face about 30 seconds before this picture was taken. It would have been priceless. If you saw my face after I took this picture, I would have looked extremely relieved!
Once the junk was out of the way, the real digging could start. Fortunately, we have very good soil for digging, so it went pretty quickly once we finally got underway. One thing that I did not plan ahead for was where to put all of the dirt that came from the dig.

Notice the pile to my right and to my left. There are also piles behind me and the biggest one of all is off to the side of our driveway. All of this dirt with limited space is going to make backfilling the new foundation a little tricky, but my plan is to get the foundation in and then worry about it.

Hopefully we will have footings and a foundation in by the end of this week. Lulu might be upset because she has figured out how to jump in (4' straight down) and out (4' straight up) of the trench and really enjoys running around in it.
After two long days of work, I am exhausted and calling it a night. Stay tuned this week for updates on our foundation if all goes as planned.